> For the complete documentation index, see [llms.txt](https://guides.noloco.io/llms.txt). Markdown versions of documentation pages are available by appending `.md` to page URLs; this page is available as [Markdown](https://guides.noloco.io/users-and-permissions/sharing-your-app.md).
# Sharing Your App
Copy your app's link, invite people by email and create invite links, all from the Share button in the builder
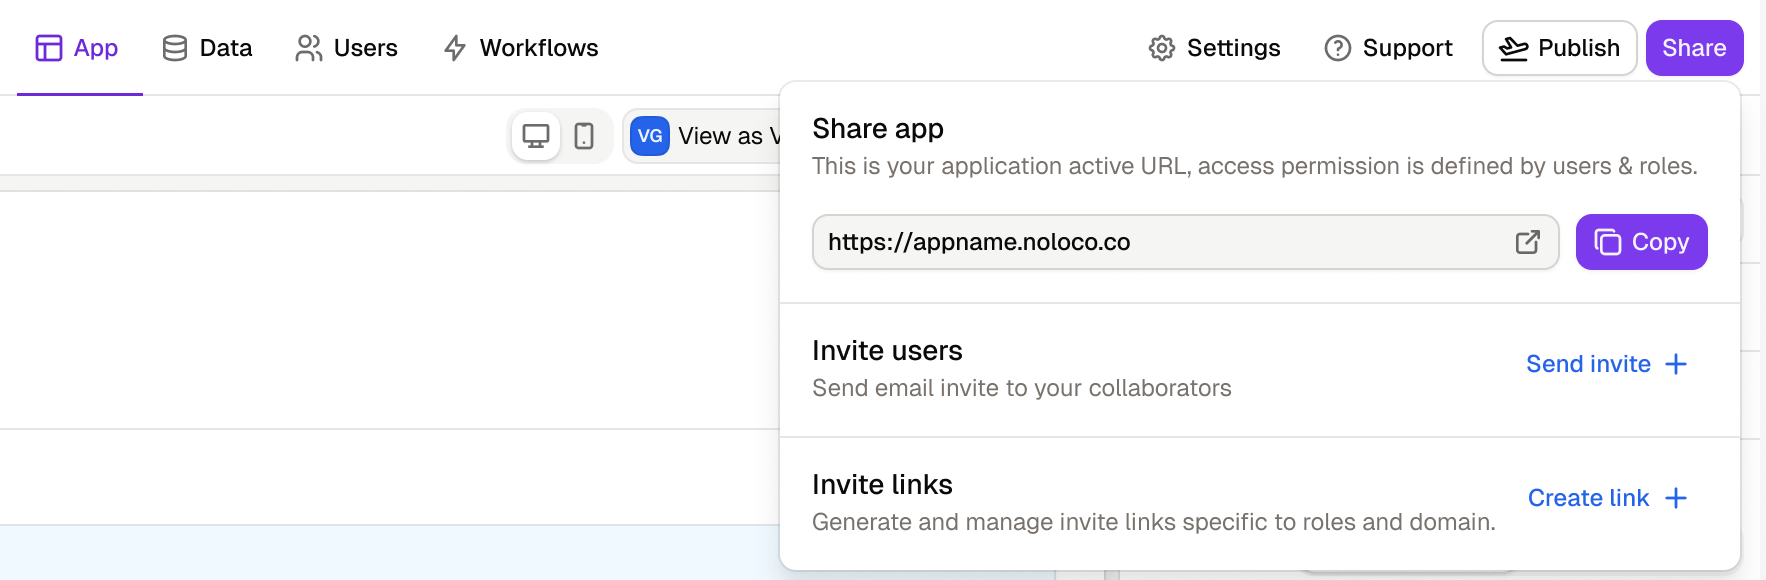
The **Share** button sits at the right end of the builder's top navigation bar, next to **Publish**. It brings everything you need to get people into your app into one place:
* **Share app**: copy your app's link or open it in a new tab
* **Invite users**: invite people by email with a role, and keep track of who hasn't accepted yet
* **Invite links**: create links that anyone can use to request access with a set role, optionally limited to your email domain
{% hint style="info" %}
Sharing your app's link doesn't give anyone access on its own. Who can log in, and what they can see, is still decided by your [users](/users-and-permissions/user-table.md) and their [roles](/users-and-permissions/user-roles-and-permissions.md). People whose role can't modify your app can only log in once [live mode](/settings/general-settings/live-mode.md) is on.
{% endhint %}
## Share app
The top of the popover shows your app's live URL. If you've set up a [custom domain](/settings/custom-domain.md), the link uses it.
* Click **Copy** to copy the link to your clipboard
* Click the open icon next to the URL to open your app in a new tab
Send the link to people who are already users of your app. To give someone new access, invite them by email or send them an invite link.
{% hint style="info" %}
Your app's link used to live in the **Publish** popover. It's now in **Share**, and the Publish popover keeps the QR code and the link to your domain settings.
{% endhint %}
## Invite users by email
Use **Invite users** to add people whose email addresses you know. Each person is added to your app as a pending user with the role you choose, and gets an invitation email to set up their account.
1. Click **Share** in the builder's top navigation bar
2. In **Invite users**, click **Send invite**
3. Pick a **Role**. The description under the selector tells you what that role can do
4. Enter one or more **Email(s)**, separated by commas. You can invite up to 5 people at a time
5. Click **Send**
The dialog closes and the new invitations appear under **Pending invitations**. If an address isn't valid, the dialog lists it so you can fix it before anything is sent.
The invitation uses your app's [invitation email templates](/settings/email-settings.md#invitation-emails): team members and people who can modify your app get the internal invitation email, and everyone else gets the customer invitation email.
### What each role can do
The description under the role selector is built from the role's settings, so it works for your custom roles too:
| Description | What it means |
| ------------------------------------------------------------- | ---------------------------------------------------------------------------------------------------------------------- |
| Can modify your app, view and manage all data. | Builder access and data admin, like the default Team Admin role |
| Can modify your app, and is restricted by data permissions. | Builder access, but the data they see follows your [permissions](/users-and-permissions/user-roles-and-permissions.md) |
| Cannot modify your app, but can view and manage all data. | No builder access, but data admin |
| Cannot modify your app and is restricted by data permissions. | A regular user, like the default User role |
Roles that your plan doesn't include show a plan badge and can't be selected. Custom roles are available on the Build plan and above.
### Pending invitations
Once you've sent invitations, **Pending invitations** shows how many people haven't accepted yet and lists the five most recent, each with their email address and role.
* Click **Resend** to send someone their invitation email again
* Click **See all users** to open the Users tab, where you can see every pending invitation, change roles, or remove invitations you no longer need
People leave the list once they've accepted their invitation and set up their account.
{% hint style="info" %}
Invited people don't take a seat on your plan until they log in for the first time. See [User types](/account/pricing.md#user-types) for how seats are counted.
{% endhint %}
### Invitation limits
To prevent spam, apps on the Free plan and on a trial can only send a limited number of invitation emails per hour and per day, and each email address can only receive a few invitations a day. If you reach a limit, wait a while before sending more invitations.
## Invite links
An invite link lets people join without you entering their email addresses one by one. Share it in a team chat, an email or an onboarding doc, and anyone who opens it can request access with the role you chose. You can limit a link to one email domain, so only your colleagues can use it.
{% content-ref url="/pages/05Y0KvtyvIjvIdiJXGJY" %}
[Invite Links](/users-and-permissions/sharing-your-app/invite-links.md)
{% endcontent-ref %}
## Which option should I use?
| Option | Best for | Who can join |
| ---------------------------------------------------------------------- | -------------------------------------------------------------- | ---------------------------------------------------- |
| [Email invite](#invite-users-by-email) | A few people whose email addresses you know | Only the addresses you enter |
| [Invite link](/users-and-permissions/sharing-your-app/invite-links.md) | A team or group of clients you don't want to invite one by one | Anyone with the link, optionally only at your domain |
| [User list](/settings/user-lists.md) | People who are already in a table in your data source | The people in the synced table |
| [Open sign up](/users-and-permissions/open-sign-up.md) | Apps that anyone should be able to join | Anyone who visits your app's `/register` page |
## Related guides
* [User Management](/users-and-permissions/user-management.md): manage every user and invitation from the Users tab
* [User Roles & Permissions](/users-and-permissions/user-roles-and-permissions.md): decide what each role can see and do
* [Email Settings](/settings/email-settings.md): customize the invitation emails
* [Live Mode](/settings/general-settings/live-mode.md): let non-builder users log in
---
# Agent Instructions
This documentation is published with GitBook. GitBook is the documentation platform designed so that both humans and AI agents can read, navigate, and reason over technical content effectively. Learn more at gitbook.com.
## Querying This Documentation
If you need additional information that is not directly available in this page, you can query the documentation dynamically by asking a question.
Perform an HTTP GET request on the following URL with the `ask` and `goal` query parameters:
```
GET https://guides.noloco.io/users-and-permissions/sharing-your-app.md?ask=&goal=
```
`ask` is the immediate question: it should be specific, self-contained, and written in natural language.
`goal` is what the user is ultimately trying to achieve, the reason they need the answer. Sharing it helps GitBook give you a better, more relevant answer. A goal is most helpful when it describes the outcome the user wants rather than restating the question. For example, with `ask=how do I create an API token`, a goal like `build a script that syncs our docs to a CMS` lets GitBook tailor the answer to that use case.
The response will contain a direct answer to the question and relevant excerpts and sources from the documentation.
Use this mechanism when the answer is not explicitly present in the current page, you need clarification or additional context, or you want to retrieve related documentation sections.