> For the complete documentation index, see [llms.txt](https://guides.noloco.io/llms.txt). Markdown versions of documentation pages are available by appending `.md` to page URLs; this page is available as [Markdown](https://guides.noloco.io/settings/mcp-integration.md).

# MCP Integration

Connect AI agents like Claude, Cursor, and Windsurf to your Noloco app data using the Model Context Protocol (MCP)

{% hint style="info" %}
**New to MCP?** Start with [Connect your own AI agent](/quickstart/connect-an-ai-agent.md) — it walks through both the app-data MCP and the guides MCP together.
{% endhint %}

The Noloco MCP (Model Context Protocol) server lets AI assistants list your tables, read records, and create, update, or delete entries through natural language.

One MCP URL covers every Noloco app where you're a data admin:

```
https://api.core.noloco.io/mcp
```

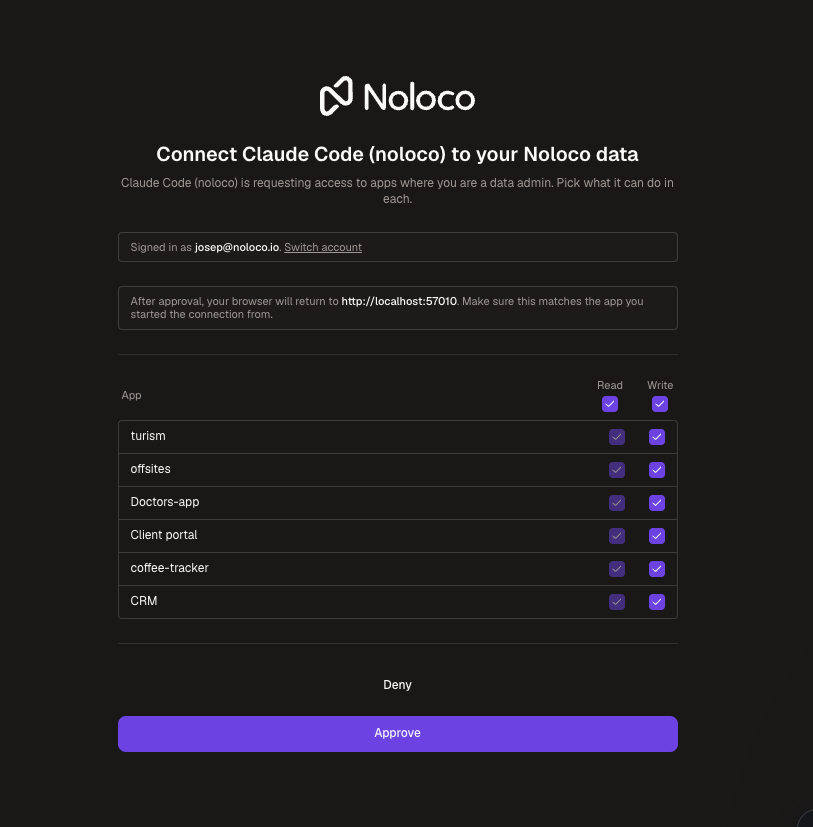
There's no API key and no per-app URL. The first time a client calls the server, a browser window opens for you to sign in and pick which apps the client can access and whether it gets read or read + write on each.

<figure><img src="https://319575345-files.gitbook.io/~/files/v0/b/gitbook-x-prod.appspot.com/o/spaces%2F-MifpIQWu0HCVYAt51oT%2Fuploads%2Fgit-blob-a53a1d7561cce3c2b5f04aaa10e31b8b94e853ad%2Fmcp-oauth-consent.png?alt=media" alt="" width="375"><figcaption><p>The Noloco consent screen — pick which apps the client can use, and whether it gets read or write on each.</p></figcaption></figure>

{% hint style="warning" %}
A connected client acts with your data admin role on every app you approve. It can read and modify all records in those apps regardless of row-level permissions. Only approve clients you trust.
{% endhint %}

### Connecting an AI Client

The Noloco MCP server uses [Streamable HTTP transport](https://modelcontextprotocol.io/specification/2025-03-26/basic/transports#streamable-http) with OAuth, which all major MCP clients support. Pick your client:

<table data-view="cards"><thead><tr><th></th><th></th><th data-hidden data-card-cover data-type="files"></th><th data-hidden data-card-target data-type="content-ref"></th></tr></thead><tbody><tr><td><strong>Claude Desktop</strong></td><td>One-click connector link</td><td><a href="https://319575345-files.gitbook.io/~/files/v0/b/gitbook-x-prod.appspot.com/o/spaces%2F-MifpIQWu0HCVYAt51oT%2Fuploads%2Fgit-blob-c3ff010be2e67e022cc2250be06027150fedaa03%2Fmcp-client-claude.svg?alt=media">mcp-client-claude.svg</a></td><td><a href="#claude-desktop">#claude-desktop</a></td></tr><tr><td><strong>Claude Code</strong></td><td>A single CLI command</td><td><a href="https://319575345-files.gitbook.io/~/files/v0/b/gitbook-x-prod.appspot.com/o/spaces%2F-MifpIQWu0HCVYAt51oT%2Fuploads%2Fgit-blob-c3ff010be2e67e022cc2250be06027150fedaa03%2Fmcp-client-claude.svg?alt=media">mcp-client-claude.svg</a></td><td><a href="#claude-code">#claude-code</a></td></tr><tr><td><strong>Cursor &#x26; Windsurf</strong></td><td>Paste one JSON block</td><td><a href="https://319575345-files.gitbook.io/~/files/v0/b/gitbook-x-prod.appspot.com/o/spaces%2F-MifpIQWu0HCVYAt51oT%2Fuploads%2Fgit-blob-8165d6d9e564c0f960d6154cb5ec7cc101a971c9%2Fmcp-client-cursor-windsurf.svg?alt=media">mcp-client-cursor-windsurf.svg</a></td><td><a href="#cursor-and-windsurf">#cursor-and-windsurf</a></td></tr><tr><td><strong>ChatGPT</strong></td><td>Turn on developer mode, then create a plugin</td><td><a href="https://319575345-files.gitbook.io/~/files/v0/b/gitbook-x-prod.appspot.com/o/spaces%2F-MifpIQWu0HCVYAt51oT%2Fuploads%2Fgit-blob-cee3918fdf3f5605514792b80a34b32a4dacf9ef%2Fmcp-client-chatgpt.svg?alt=media">mcp-client-chatgpt.svg</a></td><td><a href="#chatgpt">#chatgpt</a></td></tr><tr><td><strong>Other MCP clients</strong></td><td>Anything supporting OAuth over Streamable HTTP</td><td><a href="https://319575345-files.gitbook.io/~/files/v0/b/gitbook-x-prod.appspot.com/o/spaces%2F-MifpIQWu0HCVYAt51oT%2Fuploads%2Fgit-blob-f6f61a1301810b5f4f06158cdb245dc72edf1888%2Fmcp-client-mcp.svg?alt=media">mcp-client-mcp.svg</a></td><td><a href="#other-mcp-clients">#other-mcp-clients</a></td></tr></tbody></table>

#### Claude Desktop

The quickest route is one click: [**Add Noloco to Claude**](https://claude.ai/customize/connectors?modal=add-custom-connector\&connectorName=Noloco\&connectorUrl=https%3A%2F%2Fapi.core.noloco.io%2Fmcp). That link opens Claude's **Add custom connector** dialog with the Noloco name and URL already filled in — click **Add**, and the Noloco consent screen opens in your browser.

You can also add it by hand from **Settings → Connectors**:

* **Directory:** find **Noloco** in the connector directory and click **Connect**.
* **Custom connector:** click **Add custom connector**, enter a name (e.g. `Noloco`) and `https://api.core.noloco.io/mcp` as the remote MCP server URL, then click **Add**.

Either path opens the Noloco consent screen in your browser.

{% hint style="info" %}
Free Claude plans are limited to **one** custom connector. If you already have one connected, you'll need to remove it before adding Noloco, or upgrade your Claude plan.
{% endhint %}

#### Claude Code

Run:

```bash
claude mcp add --transport http noloco https://api.core.noloco.io/mcp
```

The next time you start a session, Claude Code opens the consent screen in your browser.

#### Cursor & Windsurf

Open the MCP settings panel and add:

```json
{
  "mcpServers": {
    "noloco": {
      "url": "https://api.core.noloco.io/mcp"
    }
  }
}
```

The first tool call opens the consent screen.

#### ChatGPT

ChatGPT has no one-click link, so there are three short steps: check your plan, turn on developer mode, then create the plugin.

**1. Check your plan**

Custom MCP plugins need a **Plus, Pro, Business, Enterprise, or Education** plan, and you have to set them up in the ChatGPT **web app** — the mobile apps can't create them. Once created, the plugin works everywhere you use ChatGPT.

**2. Turn on developer mode**

In the ChatGPT web app, go to **Settings → Apps → Advanced settings** and switch on **Developer mode**.

{% hint style="info" %}
**On a Business or Enterprise workspace?** If you don't see the Developer mode toggle, an admin has to allow it first in **Workspace Settings → Permissions & Roles → Connected Data → Create custom MCP connectors**.
{% endhint %}

**3. Create the plugin**

Developer mode adds the option to create your own plugin. You're in the right place when the dialog is titled **New Plugin**. Fill it in like this:

<table><thead><tr><th width="170">Field</th><th>What to enter</th></tr></thead><tbody><tr><td><strong>Icon</strong></td><td>Optional — skip it. PNG only, 256 × 256 px or larger, max 10 KB.</td></tr><tr><td><strong>Name</strong></td><td><code>Noloco</code></td></tr><tr><td><strong>Description</strong></td><td><code>Access to my Noloco app data. Use this to list my Noloco projects and their tables, read table schemas, and read, create, update, or delete records in those tables.</code></td></tr><tr><td><strong>Connection</strong></td><td>Leave it on <strong>Server URL</strong> — not Tunnel — and enter <code>https://api.core.noloco.io/mcp</code>, including the <code>/mcp</code> path</td></tr><tr><td><strong>Authentication</strong></td><td><strong>OAuth</strong></td></tr></tbody></table>

Although the **Description** is marked optional, it's worth filling in. ChatGPT reads it when deciding whether a question calls for Noloco, so a vague one means the model skips the plugin when you wanted it. Feel free to make it more specific to your own apps, for example by naming the tables you query most.

You can leave **Advanced OAuth settings** alone. ChatGPT discovers our OAuth details from the server URL and registers itself through dynamic client registration, so there's no client ID or secret to paste — open that panel and you'll see the discovered settings already filled in.

Save the plugin. The first time you use it, the Noloco consent screen opens for you to sign in and pick which apps ChatGPT can access.

{% hint style="warning" %}
ChatGPT will warn you that custom plugins aren't developed or verified by OpenAI. That's expected for any custom MCP server, including this one — the warning is about who built it, not about whether this URL is safe. Check that the server URL reads exactly `https://api.core.noloco.io/mcp` before you approve it.
{% endhint %}

#### Other MCP Clients

Any client that supports OAuth over Streamable HTTP can connect. Point it at `https://api.core.noloco.io/mcp` — no header, no key. The client handles the OAuth flow on first connection.

### Available Tools

Every data tool takes a `projectName` argument. The agent calls `list_projects` first to discover which apps it can see, then passes the right project name on each call.

| Tool               | What it does                                                                                               |
| ------------------ | ---------------------------------------------------------------------------------------------------------- |
| `list_projects`    | Lists every Noloco app you approved for this client, with the scope (read or read + write) granted on each |
| `list_tables`      | Lists tables in an app                                                                                     |
| `get_table_schema` | Returns a table's field types, options, and relationships                                                  |
| `list_records`     | Fetches records with optional filtering, sorting, and pagination                                           |
| `get_record`       | Fetches a single record by ID                                                                              |
| `create_record`    | Creates a record                                                                                           |
| `update_record`    | Updates a record by ID                                                                                     |
| `delete_record`    | Deletes a record by ID                                                                                     |

### Security and Access Management

* **OAuth, not API keys.** No long-lived secret is stored in the client config.
* **Per-app role check on every call.** If you lose data admin access on an app, the next call from any connected client is rejected — no token reissue needed.
* **Per-client revocation.** Each client has its own OAuth token; revoking one doesn't affect the others.
* **Scope chosen at sign-in.** Pick read-only or read + write per app on the consent screen. Re-run the flow any time to change either.
* **HTTPS only.**

### FAQ

{% content-ref url="/pages/RcBhKRljI9jgmDkTf9Pm" %}
[MCP FAQ](/settings/mcp-integration/mcp-faq.md)
{% endcontent-ref %}


---

# Agent Instructions
This documentation is published with GitBook. GitBook is the documentation platform designed so that both humans and AI agents can read, navigate, and reason over technical content effectively. Learn more at gitbook.com.

## Querying This Documentation
If you need additional information that is not directly available in this page, you can query the documentation dynamically by asking a question.

Perform an HTTP GET request on the current page URL with the `ask` query parameter, and the optional `goal` query parameter:

```
GET https://guides.noloco.io/settings/mcp-integration.md?ask=<question>&goal=<endgoal>
```

`ask` is the immediate question: it should be specific, self-contained, and written in natural language.
`goal` is optional and describes the broader end goal you are ultimately trying to accomplish on behalf of the user. GitBook uses it to tailor the answer towards what is most useful for that goal.

The response will contain a direct answer to the question and relevant excerpts and sources from the documentation.

Use this mechanism when the answer is not explicitly present in the current page, you need clarification or additional context, or you want to retrieve related documentation sections.