> For the complete documentation index, see [llms.txt](https://guides.noloco.io/llms.txt). Markdown versions of documentation pages are available by appending `.md` to page URLs; this page is available as [Markdown](https://guides.noloco.io/quickstart/connect-an-ai-agent.md).
# Connect your own AI agent
Connect Claude, ChatGPT, Gemini, or another AI assistant to Noloco using our MCP servers. Your agent works with your live app data, reads these guides, and can build your app with you.
Most teams already work with an AI assistant. By connecting yours directly to Noloco, your assistant can read your live app data, query these guides in real time, and write back to your app on your behalf, all from the chat interface you already use. If you can build an app yourself, your assistant can build it with you too: tables, pages, views, workflows, permissions, and more.
The connection uses two [Model Context Protocol](https://modelcontextprotocol.io/) (MCP) servers:
* The **Noloco builder MCP** gives your assistant access to your apps' tables, schemas, and records. On apps you can build, it can also change the app itself.
* The **Noloco guides MCP** gives your assistant read-only access to these guides — the same documentation you're reading now.
Together, these two connections turn your assistant into an expert architect. It already knows your business; it can now read both your live data and our recommended patterns, so it can tell you exactly what tables to create, what relationships you need, which views to add, and how to set up workflows and permissions for your use case. If you have builder access, it can then build those for you and publish when you're happy. Once your app is live, the same connection lets your assistant answer questions about your data and run updates for you in natural language.
{% hint style="warning" %}
A connected client acts with the same permissions as your data admin role on every Noloco app you approve during sign-in. On apps where it can build, it can also change the app and publish those changes to your users. Only connect AI clients you trust. See [MCP Integration](/settings/mcp-integration.md) for the full security model.
{% endhint %}
{% hint style="info" %}
**Not a data admin?** See [Connect your AI to an app](/settings/mcp-integration/connect-your-ai-to-an-app.md).
{% endhint %}
## What you can do with a connected AI
A few prompts that show the range:
* *"I run a small HVAC company. Design the tables and relationships I need for a job-tracking app, using Noloco's recommended patterns."*
* *"Review the schema in my current app and suggest improvements based on Noloco best practices."*
* *"Walk me through setting up a permission rule so contractors only see their own jobs."*
* *"Look up the 20 most recent records in my Jobs table and summarize which are at risk of slipping."*
* *"Create five test customers in my CRM with realistic data."*
* *"Add a board of open jobs grouped by status, and a button that marks a job as done. Publish when it's ready."*
You don't need to know Noloco's table or field names — your assistant will inspect the schema itself and use the guides MCP to look up anything it needs.
## The two MCP servers
### Noloco builder MCP
* **URL:** `https://api.core.noloco.io/mcp`
* **Auth:** OAuth — sign in to Noloco the first time you connect a client. No API key.
* **What it gives the agent:** list projects, list tables, read schemas, and list, get, create, update, or delete records. On apps you can build, it also gets tools for tables and fields, pages and views, forms, buttons, workflows, users and permissions, and settings and publishing.
* **Scope:** every Noloco app where you're a data admin and which you approve during sign-in. One connection per client covers your entire portfolio — the agent picks which app to act on per request.
For the full list of available tools, who can build, and how drafts and publishing work, see [MCP Integration](/settings/mcp-integration.md).
### Noloco guides MCP
* **URL:** `https://guides.noloco.io/~gitbook/mcp`
* **Auth:** none — public
* **What it gives the agent:** read-only access to these guides
Hosted by GitBook. Anyone can connect — no sign-in required.
## Setting up your agent
The blocks below show how to add both servers together for each major MCP client. The builder MCP triggers an OAuth sign-in the first time you use it. A browser window opens, you sign in to Noloco, and you pick which apps and which scope (read or read + write) the client gets.
### Claude Desktop
The fastest way in is one click: [**Add Noloco to Claude**](https://claude.ai/directory/noloco) opens the Noloco connector in Claude's directory — click **Connect**. You can also find it from **Settings → Connectors** by searching the directory for **Noloco**.
{% hint style="info" %}
If your organization restricts the connector directory, add Noloco as a custom connector instead: click **Add custom connector**, enter a name (e.g. `Noloco`) and `https://api.core.noloco.io/mcp` as the remote MCP server URL, then click **Add**. Free Claude plans allow only **one** custom connector.
{% endhint %}
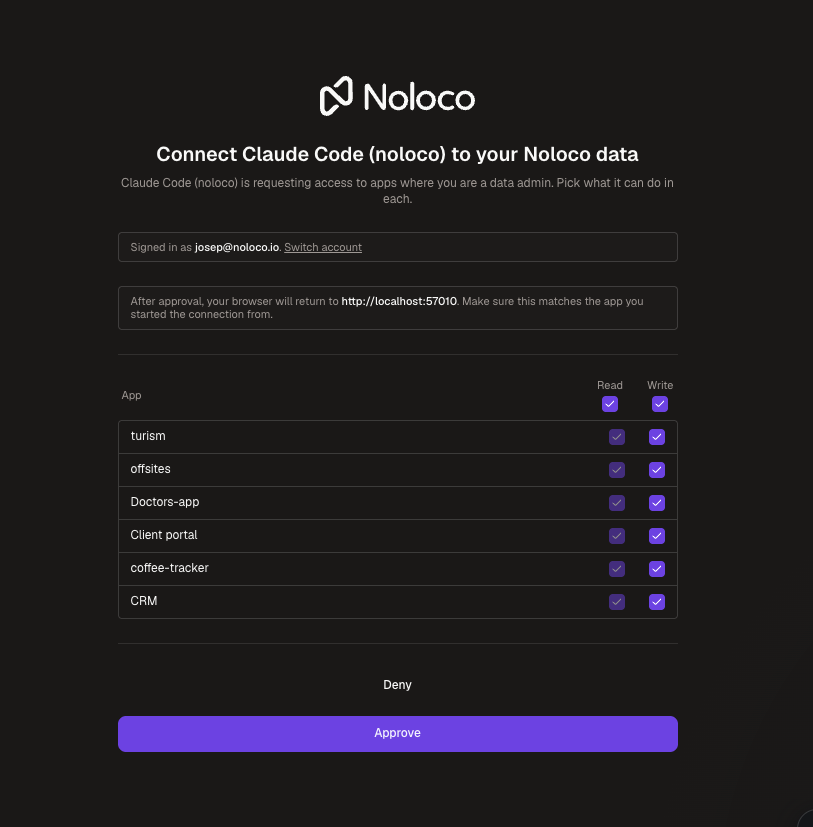
A browser window opens — sign in to Noloco, pick which apps the client can access, and choose the scope (read or read + write). Add the **Noloco guides** as a custom connector using `https://guides.noloco.io/~gitbook/mcp` (no auth).
The Noloco consent screen — pick which apps the client can use, and whether it gets read or write on each.
Once approved, you'll see the Noloco tools in Claude's tool list. You can disconnect or re-run the consent step at any time from the same Connectors screen.
### Claude Code
Run:
```bash
claude mcp add --transport http -s user noloco https://api.core.noloco.io/mcp
```
For the guides MCP:
```bash
claude mcp add --transport http -s user noloco-guides https://guides.noloco.io/~gitbook/mcp
```
`-s user` makes Noloco available in every project. Leave it out to add Noloco only to the folder you run the command in.
The next time you start a session, Claude Code shows that Noloco needs sign-in. Run `/mcp`, pick **noloco**, and choose **Authenticate** to open the consent screen. You can also run `claude mcp login noloco` from your terminal.
### Cursor
In Cursor, open **Settings → MCP** and add the following:
```json
{
"mcpServers": {
"noloco": {
"url": "https://api.core.noloco.io/mcp"
},
"noloco-guides": {
"url": "https://guides.noloco.io/~gitbook/mcp"
}
}
}
```
The first time Cursor calls a Noloco tool, a browser window opens for you to sign in and approve access.
### Windsurf
In Windsurf, open the MCP configuration panel and add the same JSON shown for Cursor. The browser will open for OAuth sign-in on first use.
### ChatGPT
The fastest way to add the **Noloco builder MCP** is one click: [**Add Noloco to ChatGPT**](https://chatgpt.com/plugins/plugin_asdk_app_6ae1e0d67d688191b1dbffdf37677595) opens the Noloco plugin in ChatGPT's plugin directory. Click **Install plugin**, then **Connect Noloco**. The Noloco consent screen opens for you to sign in and pick which apps ChatGPT can access. You can also open **Plugins** and search for **Noloco**.
The **Noloco guides MCP** isn't part of the plugin, so add it as a custom MCP server. You don't need developer mode, and it works on the free plan. In **Plugins**, click **Add**, then **Add custom MCP server**. Name it `Noloco guides`, pick **Server URL** under **Connection**, and enter `https://guides.noloco.io/~gitbook/mcp` with no auth. Tick **I understand and want to continue** below the risk warning, then click **Create as a plugin**.
{% hint style="info" %}
If your workspace admin hasn't allowed public plugins, or the plugin directory isn't available to you, add the builder MCP as a custom MCP server too: enter `https://api.core.noloco.io/mcp` as the server URL and set **Authentication** to **OAuth**. ChatGPT finds our OAuth details itself, so there's no key, header, or client secret to set up. For the full walkthrough, with every field in the form and what to put in the description, see [ChatGPT](/settings/mcp-integration.md#chatgpt) on the MCP Integration page.
{% endhint %}
### Gemini
In the Gemini app, add the **Noloco builder MCP** as a custom connector. On a computer, open [gemini.google.com/customize/connectors](https://gemini.google.com/customize/connectors) and click **Custom**. In the **Connect to an MCP server** window, enter `https://api.core.noloco.io/mcp` as the **MCP server URL** and click **Next**. The Noloco consent screen opens for you to sign in and pick which apps Gemini can access. There's no key or client secret to set up, so leave **Additional settings** closed.
Add the **Noloco guides MCP** the same way, with `https://guides.noloco.io/~gitbook/mcp` as the server URL.
To use Noloco in a chat, type `@` and pick it from the list. Once added, both connectors work in the Gemini mobile app too.
{% hint style="info" %}
Google doesn't offer custom connectors on every account yet. If you don't see **Custom**, check [Google's help page](https://support.google.com/gemini/answer/17209137) for which accounts and countries can add them. For the full walkthrough, see [Gemini](/settings/mcp-integration.md#gemini) on the MCP Integration page.
{% endhint %}
### Gemini CLI
Edit `~/.gemini/settings.json` (create it if it doesn't exist) and add:
```json
{
"mcpServers": {
"noloco": {
"httpUrl": "https://api.core.noloco.io/mcp"
},
"noloco-guides": {
"httpUrl": "https://guides.noloco.io/~gitbook/mcp"
}
}
}
```
Restart `gemini` after saving. The first Noloco tool call will open a browser for OAuth sign-in. Run `/mcp` inside the CLI to confirm both servers are connected.
### Other MCP clients
Any client that supports OAuth over the [Streamable HTTP transport](https://modelcontextprotocol.io/specification/2025-03-26/basic/transports#streamable-http) can connect. You need one URL per server:
* **Noloco builder MCP**: `https://api.core.noloco.io/mcp` (OAuth handled by the client on first call).
* **Noloco guides MCP**: `https://guides.noloco.io/~gitbook/mcp` (no auth).
See [MCP Integration](/settings/mcp-integration.md#other-mcp-clients) for additional notes.
## A sample conversation
Once both servers are connected, the interaction feels like working with a Noloco expert who already knows your business. A short example:
**You:** "I run a residential cleaning company with around 10 cleaners. I want to track customers, recurring cleaning jobs, and which cleaner is assigned to each visit. Can you design the table structure I need?"
**Your assistant:** "Let me check the Noloco guides for the recommended way to model recurring jobs and assignees…" *(reads the guides via the MCP)* "Here's what I'd suggest:
* **Customers** — name, address, phone, email, notes
* **Cleaning Jobs** — linked to Customer, frequency (one-off, weekly, fortnightly, monthly), duration, hourly rate
* **Visits** — linked to Job, scheduled date, status (Scheduled / Completed / Cancelled), assigned cleaner
* **Cleaners** — linked to Noloco's User table so each cleaner can log in
For the *assigned cleaner*, Noloco has a dedicated Assignee field type that handles this exact pattern — it links to a User and powers 'My visits' filters and notifications. Want me to use that?"
**You:** "Yes. We also need to send a reminder email to the customer the day before each visit."
**Your assistant:** "Got it. That's a Workflow on the Visits table with a *scheduled trigger* (1 day before the visit date) and a *send email* action. Want me to build the tables, views, and workflow for you now? I'll show you what I made before I publish anything."
If you have builder access and approved read + write on the app, the assistant can then build it all for you. If not, you still get a complete plan, and the build itself takes minutes.
## What this can and can't do
**Your connected assistant can:**
* Read and write records in any Noloco app you approved during sign-in
* Read those apps' table schemas and field definitions
* Look up anything in these guides in real time
* Recommend tables, fields, relationships, views, workflows, and permission rules suited to your business
* Walk you through setting up features step by step, referencing the live guides
* On apps you can build: create and change tables and fields, pages and views, forms, buttons, workflows, roles and permissions, and app settings, then publish your changes. See [Who can build with the MCP](/settings/mcp-integration.md#who-can-build-with-the-mcp).
**It can't (today):**
* Build on apps where you don't have builder access, or where you only approved read access
* Manage billing, or invite and remove users
* Change settings that need sign-in details or a set-up flow, like custom domains or SAML sign-in
## Security notes
* A connected client has the same permissions as your data admin role on every app you approved during sign-in. On apps where it can build, it can also change the app and publish. Only connect clients you trust.
* No long-lived API key is shared — OAuth tokens are issued per client and can be revoked individually.
* Permissions changes (role revoked, removed from workspace) take effect on the next tool call, no token reissue needed.
* Most changes to pages, workflow actions, and app settings stay as drafts until the assistant publishes, so your users don't see half-finished work.
* The MCP server enforces HTTPS — plain HTTP connections are not accepted.
* To disconnect a client, remove it from your Noloco connected applications.
For the full security model and a complete list of tools available on the builder MCP, see:
{% content-ref url="/pages/x2Etj6jf6m7fSkuKZE8s" %}
[MCP Integration](/settings/mcp-integration.md)
{% endcontent-ref %}
---
# Agent Instructions
This documentation is published with GitBook. GitBook is the documentation platform designed so that both humans and AI agents can read, navigate, and reason over technical content effectively. Learn more at gitbook.com.
## Querying This Documentation
If you need additional information that is not directly available in this page, you can query the documentation by asking a question.
Perform an HTTP GET request on the following URL with the `ask` and `goal` query parameters:
```
GET https://guides.noloco.io/quickstart/connect-an-ai-agent.md?ask=&goal=
```
`ask` is the immediate question: it should be specific, self-contained, and written in natural language.
`goal` is what the user is ultimately trying to achieve, the reason they need the answer. Sharing it helps GitBook give you a better, more relevant answer. A goal is most helpful when it describes the outcome the user wants rather than restating the question. For example, with `ask=how do I create an API token`, a goal like `automate deployments from our CI pipeline` lets GitBook tailor the answer to that use case.
The response will contain a direct answer to the question and relevant excerpts and sources from the documentation.
Use this mechanism when the answer is not explicitly present in the current page, you need clarification or additional context, or you want to retrieve related documentation sections.